
TPO Roofing in San Francisco — What It Actually Is, and Where the “10-Year” Number Comes From
I want to start with something most contractor websites won’t tell you, because it’s a little inconvenient. A lot of the TPO installation videos and sales pages floating around the internet say things like “TPO lasts 25 to 30 years on average, we see it here all the time.” That claim gets repeated constantly. It’s also, strictly speaking, not something anyone can actually know yet.
Modern TPO — the formulation actually being installed on roofs today — dates to around 2011. Before that, TPO went through a rough stretch. Formulations from the early 2000s had real, documented failures, the kind that got attention from roofing industry bodies, and those older membranes would degrade and break down under UV exposure in ways nobody expected going in. So when someone says “TPO lasts 30 years, we’ve seen it,” what they’ve actually seen is 15 years, tops, on the current formulation. The rest is projection based on lab testing and manufacturer warranties, not lived experience on an actual roof.
That’s not me trying to talk you out of TPO. I like TPO, for the right building, for the right reasons. I just think you deserve the honest version before you spend money on it, and honestly, that honest version is more interesting than the marketing pitch anyway.
This page covers what TPO actually is, why it makes sense for a lot of San Francisco’s flat-roof housing stock specifically, how it’s actually installed, where it falls short, and what it costs. for Free inspection contact us .
What Is TPO Roofing, Actually?
TPO stands for thermoplastic polyolefin — not “polyfin,” which is a mistake I’ve heard even professional installers make on camera, which tells you something about how young this material category still is in terms of everyone getting the fundamentals straight. It’s a single-ply membrane, meaning one continuous layer of material rather than the multiple stacked layers you’d get with modified bitumen.
Why It’s Called Thermoplastic
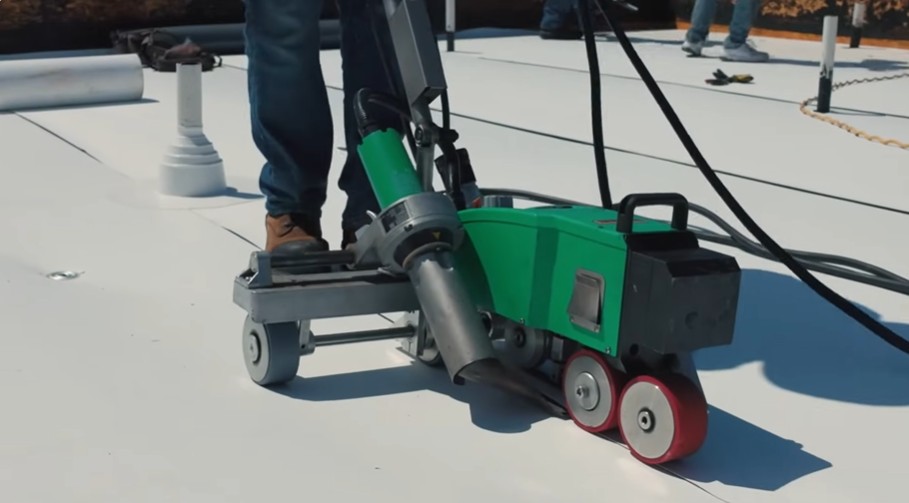
The “thermoplastic” part is the whole trick. Heat it up and it becomes workable and weldable; let it cool and it’s solid again. That’s exactly how the seams get sealed during installation — hot air fuses one sheet of TPO to the next into essentially one continuous membrane rather than a taped or glued seam that can peel apart later.
This matters more than it sounds like it should. A properly hot-air-welded TPO seam is, when done right, one of the stronger seam types available in flat roofing. When done wrong — and this happens more than anyone in the industry likes to admit — it’s one of the more common points of early failure.
Why San Francisco’s Flat Roofs Exist in the First Place
Quick aside, because I get asked this constantly and it’s genuinely a fair question. Why does San Francisco have so many flat roofs at all, when most of the country default to pitched?
Part of it is architectural history — a lot of the city’s Victorian and Edwardian building stock used flat or very low-slope roof sections by design, especially on additions and rear extensions, since it maximized usable interior space without the volume a steep pitch demands. Part of it is simply that flat roofs are more economical to build and maintain on the dense, narrow lots that define so much of this city. Either way, if you own a Sunset District rowhouse, a Mission District flat-top, or a SoMa building with a flat roof section, you’re in extremely common company here.
Why TPO Makes Sense for San Francisco Flat Roofs
Not every material fits every climate. Here’s where TPO genuinely earns its place in this city specifically.
Reflectivity and Energy Savings
TPO is typically white or light-colored, and that’s not just an aesthetic choice — it reflects a meaningful amount of solar heat rather than absorbing it. For San Francisco properties, especially anything in the city’s sunnier zones like Potrero Hill or Bernal Heights, that reflectivity translates into real cooling cost savings during warmer months, and it also plays into California’s Title 24 cool-roof compliance requirements for low-slope re-roofing projects.
Availability and Skilled Installation
TPO has become genuinely widespread over the past decade, which means finding a crew with real hot-air welding experience isn’t the challenge it might have been ten years ago. That’s a legitimate practical advantage — you’re not stuck hunting for one specialist installer in the whole Bay Area.
Where TPO Falls Short
I’d be doing you a disservice if I only told you the good parts, so here’s the honest list. TPO is less puncture-resistant than modified bitumen, and it can get genuinely slippery when wet, damp with morning fog, or coated in a light layer of algae — which matters in a city where Karl the Fog sits on rooftops constantly. It’s also not something you repair yourself; heat-welded seams require actual skill and the right equipment, so this isn’t a DIY-friendly material if something goes wrong later.
If your roof gets regular foot traffic — say, you’re climbing up there twice a year to service a rooftop HVAC unit or solar array — TPO can handle it, but it needs proper walk pads installed specifically for that purpose. Skipping that detail and just walking directly on the membrane, especially with anything sharp underfoot, is asking for a puncture.
How TPO Roofing Is Actually Installed
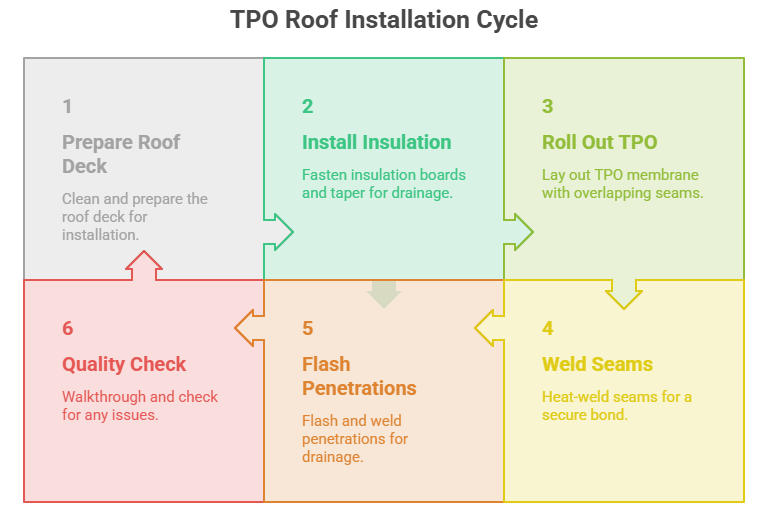
This is the part most homeowners never see explained clearly, and honestly, understanding it helps you ask better questions when you’re comparing contractor quotes.
Step 1 — Tear-Off and Deck Preparation
If there’s an existing roof, it typically needs to come off first, though in some re-cover scenarios a layer of insulation board gets installed directly over the old roofing as a protective barrier instead of a full tear-off — this depends on your specific roof’s condition and code requirements around how many existing layers are already there. Either way, the deck needs to be clean and free of debris before anything else happens.
Step 2 — Insulation Board Installation
Insulation gets fastened down to the deck, typically using manufacturer-approved fasteners reinforced with metal plates. Two common types show up here: polyiso board, which offers a higher R-value per inch and is standard for new construction or anywhere the building code demands more insulation, and fan-fold or EPS board, a more economical option often used in re-cover situations mainly as a protective buffer layer rather than for its insulating value.
At any roof drain or scupper, the insulation should be tapered specifically to direct water toward that drainage point. If you see a contractor planning to just caulk around a drain instead of properly tapering the insulation, that’s a shortcut that tends to crack and fail over time — proper tapered installation is the correct method, not the caulk-and-hope approach.
Step 3 — Rolling Out the TPO Membrane
The TPO rolls out starting from the lowest drainage point and works upward, with each subsequent row overlapping the previous by about six inches to create enough material for a proper weld. Because TPO comes in wide rolls — often five to ten feet across — there are meaningfully fewer seams overall compared to a material like modified bitumen, which typically has a new seam every three feet or so. Fewer seams means fewer potential failure points, which is a genuine structural advantage.
Step 4 — Welding the Seams
This is where installer skill matters more than almost anything else on the job. Seams get heat-welded using either an automatic hot-air welding machine for long, straight runs, or a hand-held heat gun for detail work around penetrations and corners. Every welded seam should get probed afterward — physically checked with a tool to confirm there’s a continuous bond with no gaps — as part of quality control, not skipped as an afterthought.
Step 5 — Flashing Every Penetration
Every pipe, vent stack, rooftop HVAC curb, skylight, and wall transition gets individually flashed and welded into the main membrane. This is genuinely the highest-stakes part of the entire installation. Two roofing professionals, unprompted and in separate conversations, made the exact same point: long-term roof performance comes down to drainage, penetrations, and flashing details — not the quality of the membrane material itself.
Corners and T-joints — anywhere three seams or a seam and a flashing detail meet — get an additional reinforcing patch, since these are the specific points where stress concentrates and a straightforward seam weld alone isn’t quite enough.
Step 6 — Final Walkthrough and Quality Check
A completed TPO installation should end with someone walking the entire roof, checking every welded seam, confirming every flashing detail is sealed, and making sure nothing was left behind. If a contractor’s process doesn’t include this step explicitly, ask about it — it’s not optional on a job done right.
Mechanically Attached vs Fully Adhered — Which Matters for Your Roof
TPO gets attached to the roof deck in one of two common ways, and the difference actually matters for your specific building.
Mechanically Attached
This is the more common, more economical method — the TPO gets fastened down using screws and plates rather than adhesive. It works well for most standard applications and keeps installation cost down, which is part of why it’s the default choice for a lot of residential and light commercial San Francisco projects.
Fully Adhered
Fully adhered systems use bonding adhesive across the entire surface instead of mechanical fasteners, and this method is generally preferred in higher-wind-exposure situations — which describes a fair number of San Francisco locations, particularly hillside properties in Twin Peaks or Bernal Heights, and anywhere with direct bay or ocean wind exposure. It costs more, but for a building genuinely dealing with sustained wind, it’s often worth that premium.
TPO vs Modified Bitumen — The Honest Comparison
I’m not going to pretend this is a settled argument, because it genuinely isn’t, even among roofing professionals who’ve spent decades doing this. Here’s the honest breakdown.
TPO wins on reflectivity and energy efficiency, has fewer seams due to wider roll widths, and resists bird droppings and general dirt better, which matters if you’re planning solar panels on that roof later. Modified bitumen wins on puncture resistance, handles foot traffic better once it’s had time to age and toughen, and can be patched with basic hand tools if something goes wrong — no torch or heat welder required for a repair.
For a San Francisco flat roof with genuinely minimal foot traffic — nobody up there regularly, no rooftop deck use — TPO is frequently the better call, especially with a fully-adhered installation. For a roof that sees regular foot traffic for HVAC maintenance, solar servicing, or actual rooftop deck use with furniture, modified bitumen’s toughness starts to matter more, or you need to budget for proper walk pads if you’re set on TPO specifically.
TPO Roofing Cost in San Francisco
Real numbers, with the caveat that flat roof pricing varies more than almost any other category based on specifics.
What Drives the Price
Cost depends on square footage, the type and thickness of insulation required to meet current building code R-value requirements, whether it’s a full tear-off or a re-cover over existing material, mil thickness of the TPO itself — 60-mil is a common residential and light commercial standard — and attachment method, since fully adhered systems cost more in both material and labor than mechanically attached.
Complex rooflines with multiple penetrations, drains, HVAC curbs, or unusual shapes take meaningfully longer to detail properly and cost more accordingly, since so much of the labor on a TPO job is in the flashing and welding detail work, not just rolling out the field membrane.
Warranty Reality Check
Manufacturer material warranties on TPO commonly run somewhere in the 15 to 20 year range, though it’s worth remembering that these are based substantially on accelerated lab testing rather than 20 years of real-world data, given how recently the current formulation came into wide use. Workmanship warranties from the installing contractor are a separate thing entirely, and a genuinely confident contractor should stand behind their own labor for several years independent of what the material manufacturer promises.
Ask specifically what voids the warranty — wind speed thresholds are a common one, and if you’re anywhere with regular wind exposure, that detail is worth understanding before you sign anything.