How Torch Down Roofing Is Installed in SF

There’s a Reddit post that comes up a lot in roofing circles — a homeowner in what looks like a fairly typical SF rowhouse posts photos of a brand new torch down roof, asking if it’s supposed to look like that. It’s covered in visible boot prints pressed permanently into the surface. The seams look inconsistent. And the top comment, from a roofer with genuine credibility in that community, says flatly: it should not look like that.
What followed was one of the more educational threads I’ve read on this topic — a dozen actual roofers, unprompted, diagnosing exactly what went wrong from a handful of photos. Cold material that never got properly warmed before installation. Wrinkles in the base sheet that never got walked out. Boot prints baked permanently into a membrane that was clearly still hot when someone walked across it, which happens when the whole sheet gets torched at once instead of properly sequenced.
I bring this up first because it’s the best illustration I’ve found of why installation quality matters more than almost any other factor in how long a torch down roof actually lasts. This page walks through what correct installation actually looks like, step by step, and — just as important — what the warning signs of a bad job actually are, based on what real roofers flag when they see one.
Why San Francisco’s Climate Makes Installation Quality Matter More
Torch down roofing bonds to the deck through heat-applied modified bitumen, and for that bond to form correctly, the surface underneath needs to be clean, dry, and structurally sound. This isn’t unique to San Francisco. What is unique to San Francisco is how hard this city’s climate makes “dry” actually happen.
Fog Doesn’t Just Sit on the Roof — It Gets Into the Deck
Continuous fog exposure allows moisture to work its way into wood decking over time, particularly in older flat roofs that were never given a real chance to fully dry out between reroofing cycles. This is exactly why moisture testing before installation isn’t a nice-to-have step here — it’s the difference between a roof that bonds correctly and one that traps steam under the membrane the moment the torch touches it.
Torch-applied roofing behaves a lot like paint over a wall with hidden problems. If there are cracks, moisture, or soft spots underneath, even the best material in the world will eventually reveal them. San Francisco’s fog cycles specifically amplify that risk in ways a drier climate simply doesn’t.
Learn More, Best Torch Down Materials
Which Neighborhoods Feel This the Most
Homes in coastal-facing districts — the Outer Sunset and Outer Richmond specifically — deal with the most consistent moisture exposure, and roof decking in these areas is more likely to have developed rot beneath old layers over time, sometimes to the point where the deck is too soft to properly support new torch-applied material without repair first.
Even the daily weather pattern varies enough across the city to matter for scheduling. The Outer Sunset can stay damp well into midday, while the Mission District warms up earlier and stays dry longer. Elevated areas like Twin Peaks see rapid temperature drops in the late afternoon that affect how the material behaves during application. A contractor who schedules every job the same way regardless of neighborhood isn’t accounting for a real, documented difference in how this city’s microclimates behave.
What Correct Torch Down Installation Actually Looks Like — Step by Step
Here’s the real process, in order, the way it’s supposed to happen.
Step 1 — Full Roof Deck Inspection
Before anything else, the deck gets physically walked and tested — probing for soft spots, checking for rot, looking for sagging or delamination. This is a tactile inspection, not a visual glance from a ladder, and it’s the step that determines almost everything that follows.
Step 2 — Moisture Testing and Drying the Substrate
Professionals use moisture meters or infrared tools to detect dampness trapped within the deck that isn’t visible from the surface. This step matters enormously in San Francisco specifically, because torching over hidden moisture creates steam pockets under the membrane — and those steam pockets are exactly what eventually shows up as blistering months or years later.
Step 3 — Existing Roof Removal or Cleaning
Depending on the roof’s condition, this is either a full tear-off or a methodical cleaning process removing old membrane, debris, protruding nails, and deteriorated material layers. Any residual debris left on the deck weakens adhesion for everything installed on top of it, so this step doesn’t get rushed on a job done correctly.
Step 4 — Structural Repairs and Deck Replacement
Any rotted or weakened decking gets replaced at this stage, and sagging areas get reinforced or rebuilt to restore proper slope. Skipping this step to save time is exactly how long-term drainage problems get built directly into a brand new roof.
Step 5 — Tapered Insulation Where Needed
On genuinely flat sections, tapered insulation creates the slope needed to guide water toward drains or scuppers rather than letting it pool. Given how much of San Francisco’s rainy season concentrates into a handful of heavy atmospheric river events, proper drainage design at this stage isn’t optional — it’s the thing standing between a roof that sheds water and one that ponds it.
Step 6 — Priming the Surface
Primer acts as the bonding agent that prepares the substrate for heat-applied bitumen — it reduces dust, seals minor surface pores, and encourages uniform adhesion once the torch comes out. Skipping primer, or applying it inconsistently, is a well-documented shortcut that shows up later as adhesion failure.
Step 7 — Letting the Membrane Relax Before Application
This is a detail most homeowners never hear about, and it’s exactly the kind of thing that separates an experienced crew from a rushed one. Modified bitumen rolls need to be unrolled and allowed to fully relax — typically around 30 minutes — before installation, so the material lies flat instead of retaining the memory of how it was rolled at the factory.
Real roofers discussing that bad-installation Reddit thread pointed to exactly this as a likely cause of the wrinkles and inconsistent bonding in those photos — cold material, rolled out and torched down before it had a chance to relax, essentially locking factory-roll wrinkles permanently into the finished roof.
Step 8 — Torch Application and Sealing
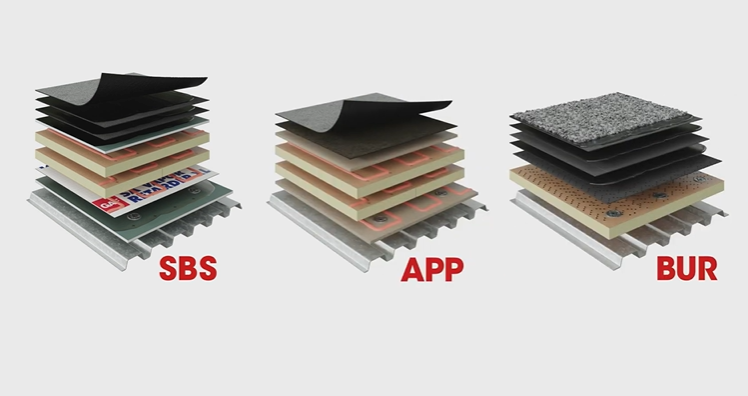
The base sheet gets attached to the deck or coverboard using heat welding, adhesive, or fasteners depending on the system. The granulated cap sheet then goes over the base sheet, with a handheld torch carefully applied to fuse the layers into a seamless, chemically bonded membrane.
Every seam, every penetration, every flashing detail gets properly welded here — this is not a step where speed should be prioritized over thoroughness, and it’s the single most skill-dependent part of the entire installation.
Step 9 — Final Inspection
Once installed, a proper crew walks the entire finished roof checking that flashing covers every vulnerable point and that the membrane isn’t wrinkled or lifted anywhere. Any issues get reheated and resealed on the spot, not left for a future service call.
Real Warning Signs of a Bad Torch Down Installation
This section exists because of that Reddit thread, and because I think homeowners deserve to know what actual professionals look for, not just a vague “hire someone good” platitude.
Visible Boot Prints Permanently Pressed Into the Membrane
Foot prints don’t stay impressed into torch down material unless someone walked across it while it was still hot from torching. If a finished roof shows boot prints baked into the surface, that’s a strong sign the whole sheet was torched at once rather than properly sequenced in sections, which is a genuine installation shortcut.
Wrinkles or “Fish Mouths” in the Seams
A fish mouth is exactly what it sounds like — a small gap or opening in a seam, and it’s a real, correctable defect if caught early, but a real vulnerability if left alone. These often trace back to material that wasn’t allowed to properly relax before installation, or wasn’t kept warm enough in cooler weather before being applied.
Inconsistent Torching at Penetrations
Penetrations — pipe boots, vents, flashing around chimneys — need the field sheet properly torched to the flange, generally with asphalt primer on any metal components first. Some roofers specifically flagged in that discussion that penetrations done outside traditional torch-and-primer methods, relying on caulk or sealant instead, are a shortcut that tends to fail years before the rest of the roof does.
What a Good Contractor Does During Your Final Walkthrough
Ask to be walked across the finished roof yourself, and ask specifically about any areas that look uneven, any visible seams, and how penetrations were handled. A contractor confident in their own work will walk this with you without hesitation. A vague or defensive answer to a direct question about seam quality is itself useful information.
How to Evaluate Prep Quality Before Work Even Starts
You don’t need to wait until the roof is finished to judge whether it’s being done right.
A Homeowner’s Checklist for Quality Prep Work
Watch for whether the contractor physically inspects the deck rather than glancing at it, whether they test for moisture rather than assuming dryness, whether they repair damaged sections before installing anything on top, and whether they clean the surface thoroughly rather than working around existing debris. Each of these is a visible, observable step you can watch happen — or notice being skipped.
The Real Cost of Skipping Proper Prep
When substrate issues get ignored, the consequences don’t usually show up on day one. Blistering happens when trapped moisture expands beneath the surface over time. Poor adhesion leads to early cracking and seam separation well before the material’s rated lifespan should have been reached.
When surface preparation is done correctly, on the other hand, a torch down roof can genuinely reach its full manufacturer-rated lifespan, with fewer repairs and more reliable waterproofing over the life of the system.
Frequently Asked Questions About Torch Down Roofing Installation in San Francisco
FINAL CTA SECTION
If you’re getting quotes for a torch down roof, ask to see how the crew handles deck inspection and prep before anything gets torched down — that’s the step that actually determines how long your roof lasts.
Call or Text: +1628 2214900 for Inspection. We Show You the Deck Before We Cover It. No Shortcuts.